Lite mixed precision
Lite Mixed Precision (Lite-MP) automatically identifies the layers most sensitive to quantization and selectively increases the precision (e.g., to INT16 or FP16) for a configurable percentage of those layers.
Lite-MP is only available in aimet-onnx.
In aimet-onnx, Lite-MP enables mixed precision through the following steps:
Step 1: QuantAnalyzer
This component profiles the model by enabling quantization one layer at a time and measures the PSNR (Peak Signal-to-Noise Ratio) between the original FP32 output(s) and the quantized output(s). It then generates a sensitivity report that ranks layers based on their impact on model accuracy.
Step 2: Precision Adjustment via Lite-MP
Using the sensitivity report, AIMET Lite-MP sorts layers by their PSNR degradation. The layers with the highest sensitivity—those causing the greatest drop in PSNR—are selected and converted to higher precision to preserve model performance.
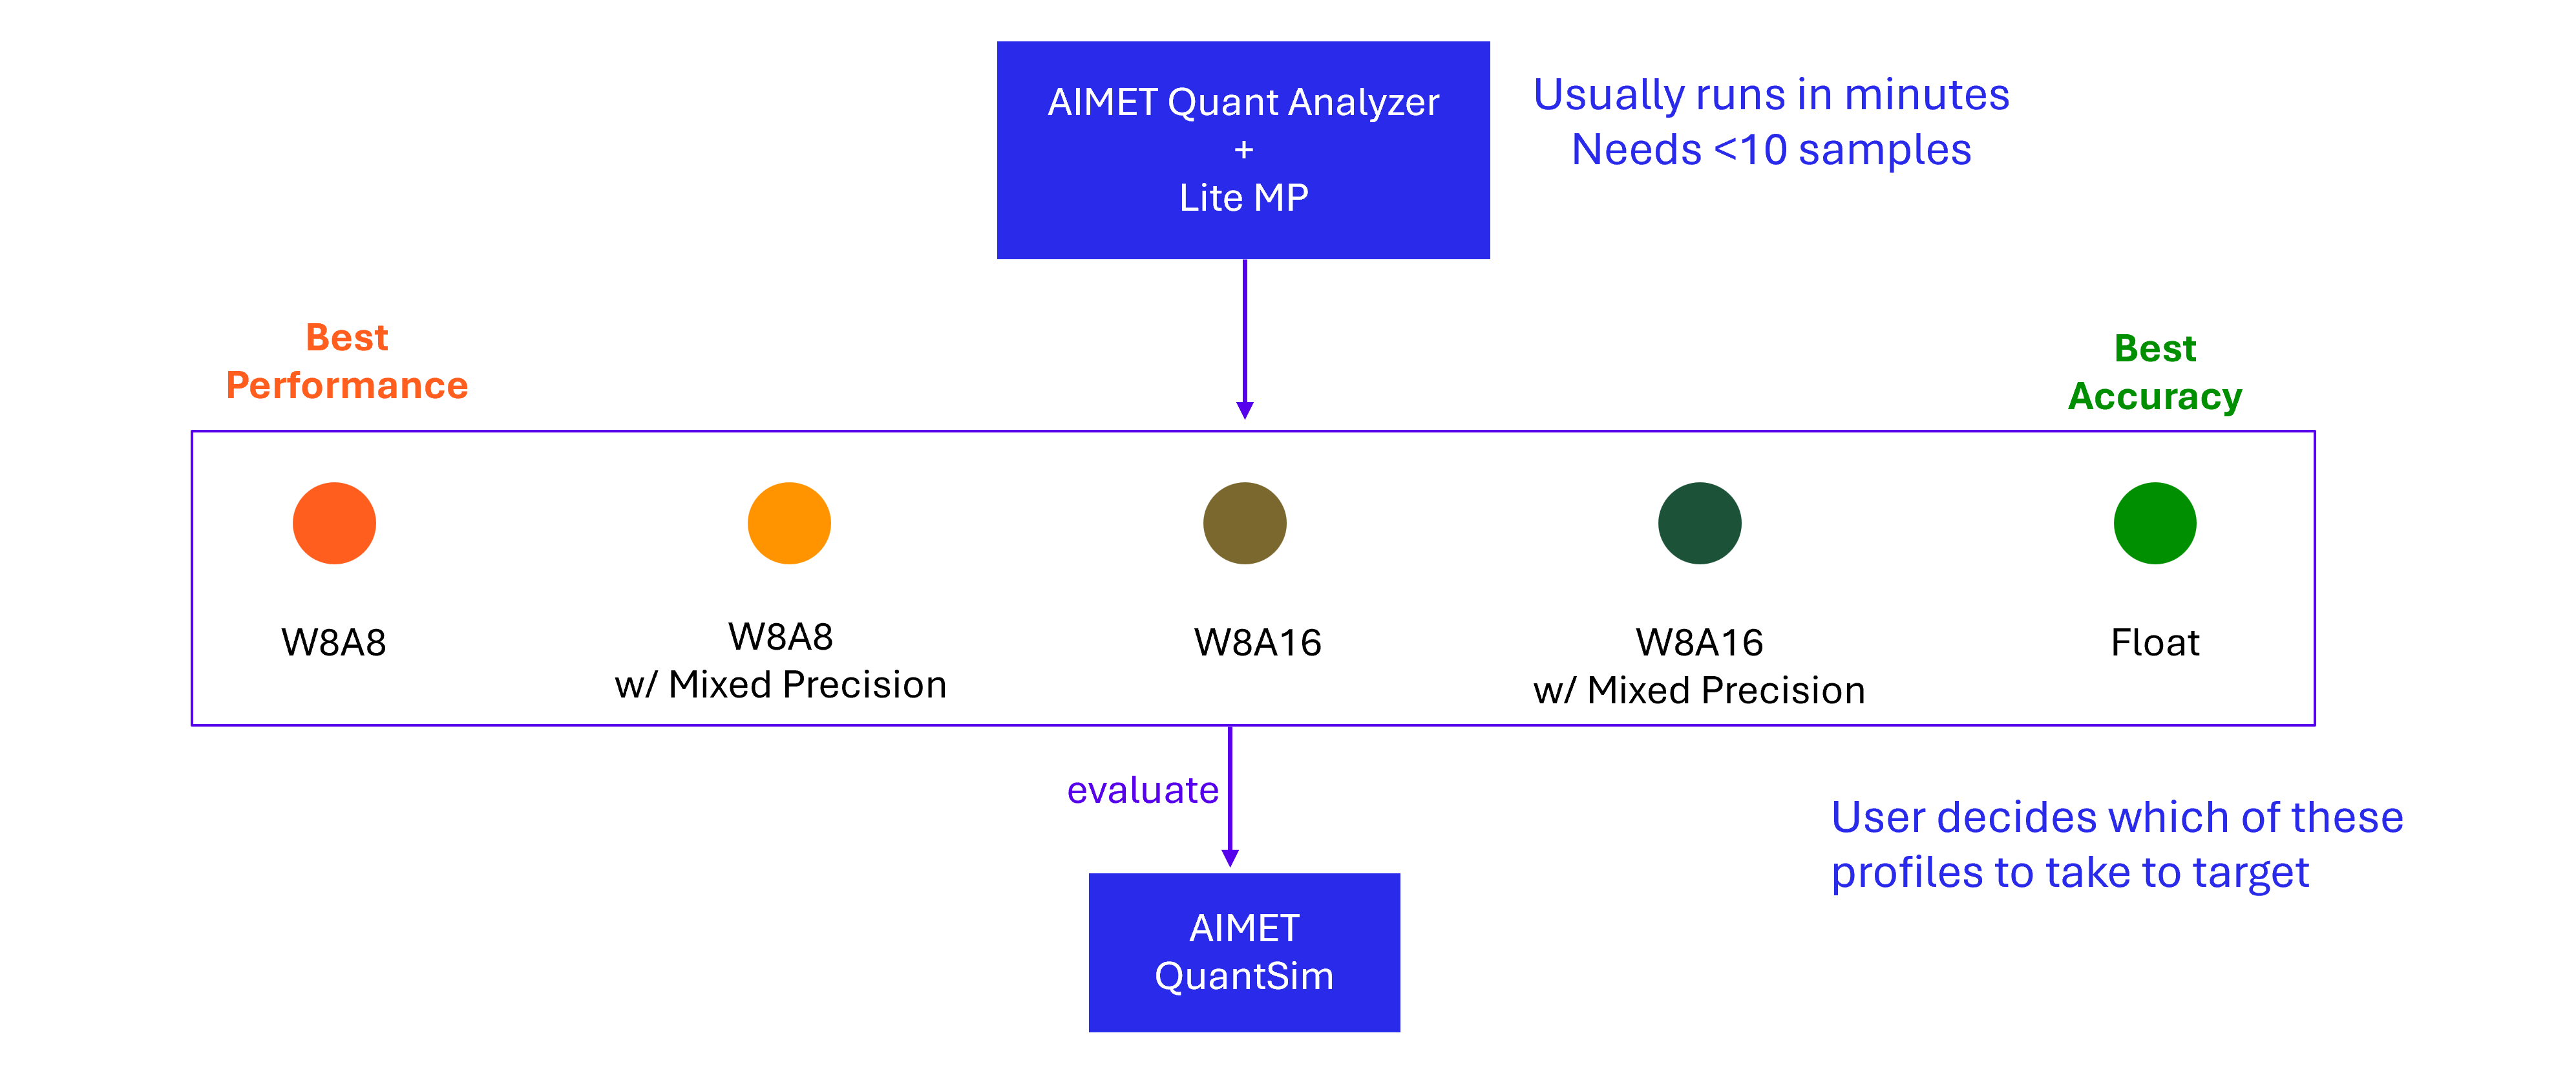
Lite-MP can quickly determine mixed-precision configuration, balancing the model accuracy with inference latency.
Workflow
Let’s take an example for applying Lite-MP to a MobileNetV2 model.
Prerequisites
Download ImageNet dataset
wget -P ./imagenet_dataset https://image-net.org/data/ILSVRC/2012/ILSVRC2012_devkit_t12.tar.gz
wget -P ./imagenet_dataset https://image-net.org/data/ILSVRC/2012/ILSVRC2012_img_val.tar
If you already have imagenet dataset locally that you would like to use, simply replace dataset path from imagenet_dataset later.
Load PyTorch model and dataset
Note
The examples below use a pre-trained MobileNetV2 model. You can also load your model instead.
import os
import copy
import numpy as np
import onnx
import torch
import onnxruntime
from tqdm import tqdm
from torchvision.models import MobileNet_V2_Weights, mobilenet_v2
pt_model = mobilenet_v2(weights=MobileNet_V2_Weights.DEFAULT)
input_shape = (1, 3, 224, 224)
dummy_input = torch.randn(input_shape)

# Modify file_path to save model at a different location
file_path = os.path.join('./', 'mobilenet_v2.onnx')
torch.onnx.export(pt_model,
                  (dummy_input,),
                  file_path,
                  input_names=['input'],
                  output_names=['output'],
                  dynamic_axes={
                      'input': {0: 'batch_size'},
                      'output': {0: 'batch_size'},
                  },
                  dynamo=False,
                  )

# Load exported ONNX model
onnx_model = onnx.load_model(file_path)
Optionally simplify the exported onnx graph before quantization. This is not strictly required but may improve accuracy and runtime performance.
import onnxsim
onnx_model, _ = onnxsim.simplify(onnx_model)
from torchvision import transforms, datasets
from torch.utils.data import DataLoader, random_split

BATCH_SIZE = 32
NUM_CALIBRATION_SAMPLES = 100

def get_calibration_and_eval_data_loaders(path: str, batch_size: int = BATCH_SIZE):
    """
    Returns calibration and evaluation data-loader for ImageNet dataset from provided path
    """
    transform = transforms.Compose(
        [
            transforms.Resize(256),
            transforms.CenterCrop(224),
            transforms.ToTensor(),
            transforms.Normalize(mean=[0.485, 0.456, 0.406], std=[0.229, 0.224, 0.225]),
        ]
    )

    dataset = datasets.ImageNet(path, split='val', transform=transform)
    calibration_dataset, eval_dataset = random_split(
        dataset, [NUM_CALIBRATION_SAMPLES, len(dataset) - NUM_CALIBRATION_SAMPLES]
    )

    calibration_data_loader = DataLoader(calibration_dataset, shuffle=False, batch_size=batch_size)
    eval_data_loader = DataLoader(eval_dataset, shuffle=False, batch_size=batch_size)
    return calibration_data_loader, eval_data_loader

# Change path here to point to different dataset
PATH_TO_IMAGENET = './imagenet_dataset'
calibration_data_loader, eval_data_loader = get_calibration_and_eval_data_loaders(PATH_TO_IMAGENET, BATCH_SIZE)
Evaluate FP32 model
import math
import itertools

def evaluate(session, data_loader, num_samples=1000):
    """
    Evaluate an ONNX model on a subset of ImageNet data
    """
    correct_predictions = 0
    total_samples = 0
    input_name = session.get_inputs()[0].name
    max_batches = math.ceil(num_samples / BATCH_SIZE)

    for i, (inputs, labels) in enumerate(tqdm(itertools.islice(data_loader, max_batches))):
        pred_probs, *_ = session.run(None, {input_name: inputs.numpy()})
        pred_labels = np.argmax(pred_probs, axis=1)
        correct_predictions += np.sum(pred_labels == labels.numpy())
        total_samples += labels.shape[0]

    accuracy = correct_predictions / total_samples
    return accuracy

fp_session = onnxruntime.InferenceSession(
    onnx_model.SerializeToString(),
    providers=["CUDAExecutionProvider"]
)
fp_accuracy = evaluate(fp_session, eval_data_loader)
print(f'fp32 accuracy: {fp_accuracy:.4f}')
fp32 accuracy: 0.6885
Step 1: Creating a QuantSim model
Use AIMET to create a QuantizationSimModel. AIMET inserts
fake quantization operations in the model graph and configures them.
from aimet_onnx.common.defs import QuantScheme
from aimet_onnx import int8, int16
from aimet_onnx import QuantizationSimModel, compute_encodings

# If CUDA acceleration is not available, simply use providers = ["CPUExecutionProvider"]
providers = ["CUDAExecutionProvider"]
sim = QuantizationSimModel(
    copy.deepcopy(onnx_model),
    param_type=int8,
    activation_type=int8,
    quant_scheme=QuantScheme.min_max,
    config_file="default",
    providers=providers
)
Step 2: Computing encodings
Next, call compute_encodings() to pass representative
data through the quantized model. The quantizers in the quantized model use the observed inputs
to initialize their quantization encodings. “Encodings” refers to the scale and offset quantization parameters.
# Compute quantization parameters using representative data for all the quantizers in the model
input_name = sim.session.get_inputs()[0].name
with compute_encodings(sim):
    for i, (inputs, _) in enumerate(calibration_data_loader):
        _ = sim.session.run(None, {input_name: inputs.numpy()})
Step 3: Evaluation of w8a8 base precision
Next, evaluate the QuantizationSimModel to measure the model’s accuracy after quantization.
w8a8_accuracy = evaluate(sim.session, eval_data_loader)
print(f'quantized accuracy (w8a8): {w8a8_accuracy:.4f}')
quantized accuracy (w8a8): 0.6836
Step 4: Perform sensitivity analysis
Lite-MP requires only a small number of samples during per-layer analysis to evaluate layer sensitivity to quantization
from aimet_onnx.utils import make_psnr_eval_fn
from aimet_onnx import analyze_per_layer_sensitivity

# Only few samples are required.
fp_inputs = [{input_name: x.numpy()} for x, _ in itertools.islice(calibration_data_loader, 1)]
psnr_eval_fn = make_psnr_eval_fn(fp_session, fp_inputs)
layer_sensitivity_dict = analyze_per_layer_sensitivity(
    sim, eval_fn=psnr_eval_fn
)
Step 5: Apply precision adjustment
Convert the most sensitive layers to higher precision (e.g., INT16 or float16) to recover accuracy.
In this example, the least sensitive layers remain in W8A8 precision, while the weights and output quantizers of the most
sensitive layers are flipped to INT16 precision.
from aimet_onnx.lite_mp import flip_layers_to_higher_precision

percentage = 10 # Percentage of layers to flip
override_precision = int16 # Precision to sets layers to
flip_layers_to_higher_precision(
    sim, layer_sensitivity_dict, percentage, override_precision
)
Step 6: Recompute encodings
Recalibrate the mixed precision profile.
with compute_encodings(sim):
    for i, (inputs, _) in enumerate(calibration_data_loader):
        _ = sim.session.run(None, {input_name: inputs.numpy()})
Step 7: Evaluation of w8a8_mixed precision
w8a8_mp_accuracy = evaluate(sim.session, eval_data_loader)
print(f'quantized accuracy (w8a8_mixed): {w8a8_mp_accuracy:.4f}')
quantized accuracy (w8a8_mixed): 0.6865
API
Top-level API
- aimet_onnx.lite_mp.flip_layers_to_higher_precision(sim, layer_sensitivity_dict, percent_to_flip=10.0, override_precision=float16)[source]
Given a sim object and a layer-sensitivity dictionary, flip a given percentage of the layers to higher precision.
- Parameters:
sim (
QuantizationSimModel) – QuantizationSimModel instance initialized with the base precisionlayer_sensitivity_dict (
Dict[str,float]) – Dict of (layer_name: sqnr_metric) that is output from analyze_per_layer_sensitivitypercent_to_flip (
float) – Percentage of layers to flipoverride_precision (
qtype) – Precision to sets layers to. At present, either int16 (w16a16) or float16 are supported.