AIMET quantization diagnostics
AIMET supports various neural network quantization techniques. See User Guide.
If the model’s performance is still not satisfactory after applying an AIMET quantization feature, we recommend a set of diagnostic steps to identify the bottlenecks and improve performance. These debugging steps can provide insights as to why a quantized model underperforms and help to address the underlying issues, but they are not algorithmic. Some trial and error might be required.
The steps are shown as a flow chart in the following figure and are described in more detail below:
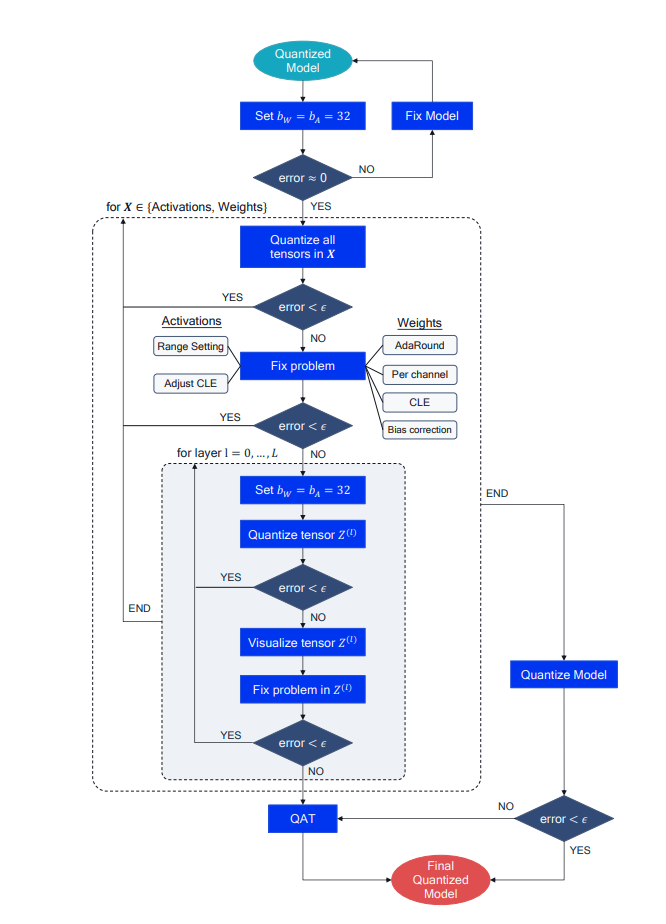
- 1. FP32 confidence check
First, ensure that the floating-point and quantized model behave similarly in the forward pass, especially when using custom quantization pipelines. Set the quantized model bit-width to 32 bits for both weights and activation, or by-pass the quantization operation if possible, and check that the accuracy matches that of the FP32 model.
- 2. Weights or activations quantization
Next, identify how activation or weight quantization impacts the performance independently. Does performance recover if all weights are quantized to a higher bit-width while activations are kept in a lower bitwidth, or vice versa? This step can show the relative contribution of activations and weight quantization to the overall performance drop and point toward the appropriate solution.
- 3. Fixing weight quantization
If the previous step shows that weight quantization causes significant accuracy drop, try the following solutions:
Apply cross-layer equalization (CLE) if not already implemented, especially for models with depth-wise separable convolutions.
Try per-channel quantization. This addresses the issue of uneven per-channel weight distribution.
Apply bias correction or AdaRound if calibration data is available.
- 4. Fixing activation quantization
Generic CLE can lead to uneven activation distribution. To reduce the quantization error from activation quantization, try using different range setting methods or adjust CLE to take activation quantization ranges into account.
- 5. Doing per-layer analysis
If global solutions have not restored accuracy to acceptable levels, consider each quantizer individually. Set each quantizer sequentially to the target bit-width while holding the rest of the network at 32 bits (see inner for loop in figure.
- 6. Visualizing layers
If the quantization of an individual tensor leads to significant accuracy drop, try visualizing the tensor distribution at different granularities, for example per-channel, and dimensions,for example per-token or per-embedding for activations in BERT.
- 7. Fixing individual quantizers
The previous step (visualization) can reveal the source of a tensor’s sensitivity to quantization. Some common solutions involve custom range setting for this quantizer or allowing a higher bit-width for a problematic quantizer. If the problem is fixed and the accuracy recovers, continue to the next quantizer. If not, you might have to resort to other methods, such as quantization-aware training (QAT).
- 8. Quantize the model
After you complete these steps, quantize the complete model to the desired bit-width. If the accuracy is acceptable, this yields a final quantized model ready to use. Otherwise, consider higher bit-widths and smaller granularities or revert to more powerful quantization methods, such as quantization-aware training.